Library module, or archiving module, this will probably be one of the places where you will spend the most time on Lightroom. And the key word to understand Lightroom completely is module, keep that in mind.
But don’t worry, just think of the modules as different sections of the same thing, where you can do some things and not others. The two most used modules are the Library, where your photos are organized, and the Development module, where you will edit your photos.
Where to find and access Lightroom modules
All Lightroom modules can be accessed at the top of the main window, just clicking on the tabs will load all the necessary settings for a given module to work.
Lightroom library module
The first module we are going to talk about today is the Lightroom library module, and as the name suggests is an overview of all your photos and organization options and basic editing options. With a photo gallery look the library module will help you to sort, organize, enter keywords and many more.
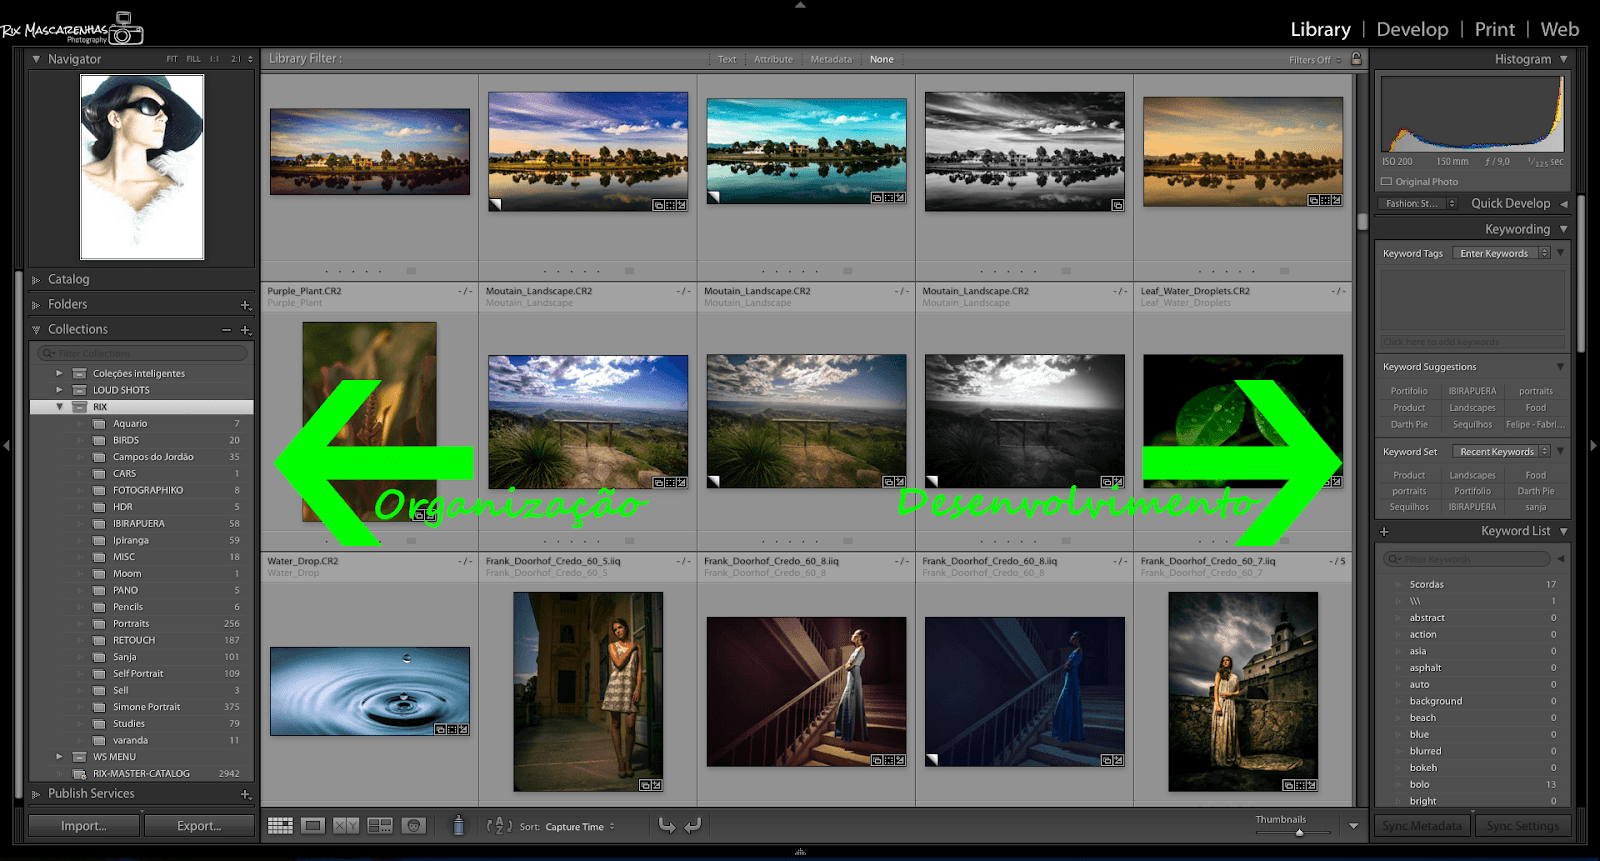
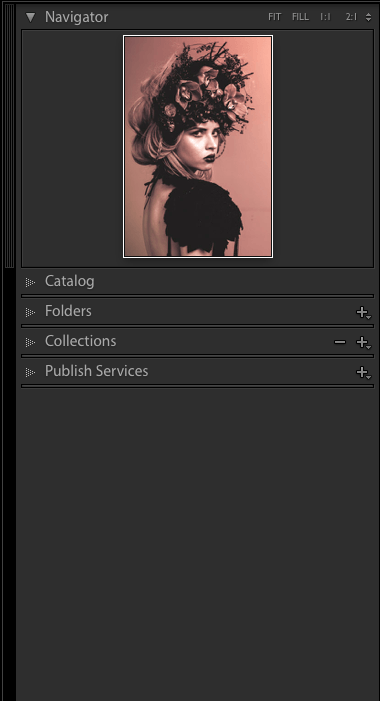
This is the overview in the Adobe Lightroom library module. I treat the tabs as organization (left) and development (right).
Keywords
In the side tab on the right, you can insert keywords in your photos, to have a more dynamic search. In keywords I usually use the name of the person or place that was photographed, what is the type of photo (portrait, landscape, etc.), what was the type of lighting and anything else that will help me locate my photos in the future, this makes my organization much easier. If a photo also becomes part of a portfolio, I also insert the keyword for the portfolio, such as Instagram as an example

You can enter as many keywords as you want, but always try to separate by categories that are logical for you.
Metadata
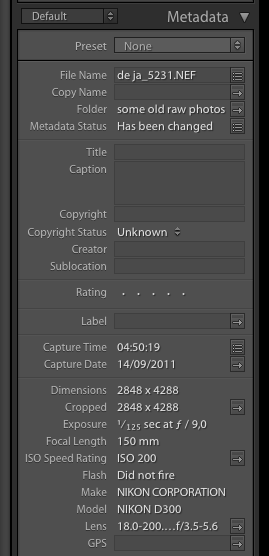
In the metadata section you will see important information about your photos, such as what the settings were on your camera, or which lens you used, normally this is done automatically by the program, so you don’t have to worry about it. This is very useful to use in the future in case you need technical information about your photos, or to try to produce a certain effect.
Quick edit
In the development tab you can also make small changes to your photos, called Quick Develop. Very useful when you are reviewing your photos and need to make small adjustments to get an idea of what the final product will look like.
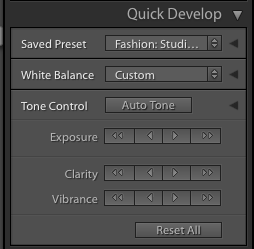
Minor adjustments to exposure , clarity and vibrance can be made at this point, without a problem. However, this section is not a substitute for the full Development Module that we will talk about in another article.
Browse photos and change view modes
Search
In the top and bottom bar you will find great tools, and believe me once you get used to them you will not want to live without them.
In the top bar we find the photo search section.

The search can be done in more ways than one, and things like photo classification, keywords and metadata show their value here.

If you are looking for a photo using the metadata section, you will have the option of limiting your search in a very interesting way, as you can create specific combinations for your search, bringing in response only those photos that fit the parameters you determine.
The options are:
● year
● camera
● Lenses
● Classification labels
● File extension
Selecting the options you see necessary, Lightroom will return only the photos that fit this search.
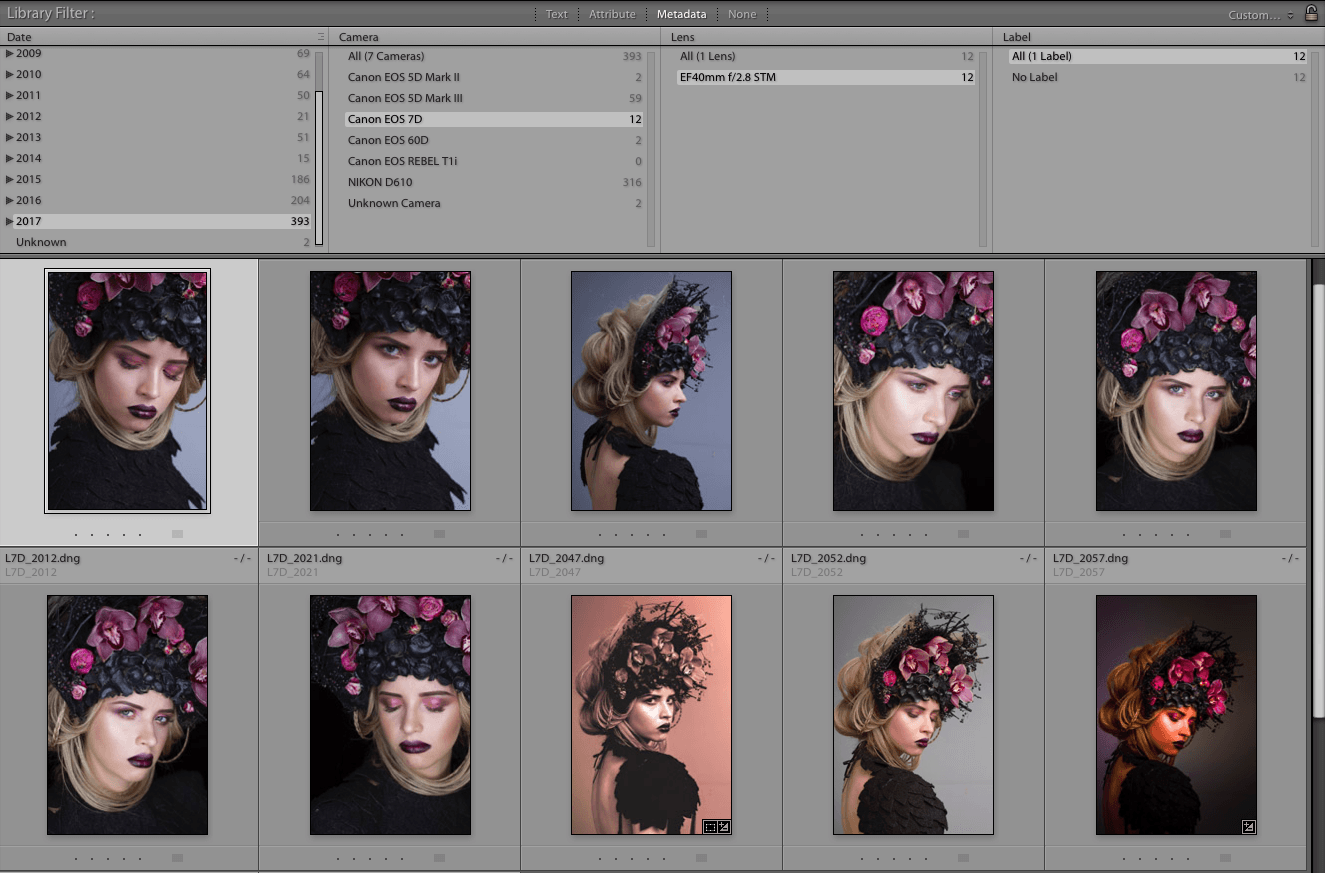
Other search parameters can be searched, so make use of this tool in the way that is most convenient for you and the search you want to perform.
Zoom and Preview
In the lower bar of the library module you will find options for viewing photos and also a bar to adjust the size of your thumbnails.

From left to right in the photo above we have:
● Gallery view
● Viewing only one photo
● Photo comparison
● Photo choice mode
● Face recognition mode
● Spray can (Used to select, mark or even apply presets to photos)
● Type of presentation (In alphabetical order, date of capture, etc …)
● Rotate photos.
All these tools are very useful when choosing, comparing or organizing photos, check out how each one works and become familiar with them, as all these tools will speed up the entire process of choosing your photos.
On the same bar, only on the right side, we have a slider that will help you adjust the size of your thumbnails when in gallery mode, which can also be made holding CTRL + Scroll wheel on the mouse or Command + Scroll wheel for WIndows users, or the mouse for those using macOS.
Lightroom organization tab
In this tab you will find all types of photo organization tools, you will find all the photos in this catalog and some other options like Collections, folders and also how to distribute them.
Folders
As the name of the tab suggests, here you will have access to the folders where your photos are living. You will also have access to all the hard drives present on your computer.

The options here are almost the same as when using Windows Explorer or Finder on your computer.
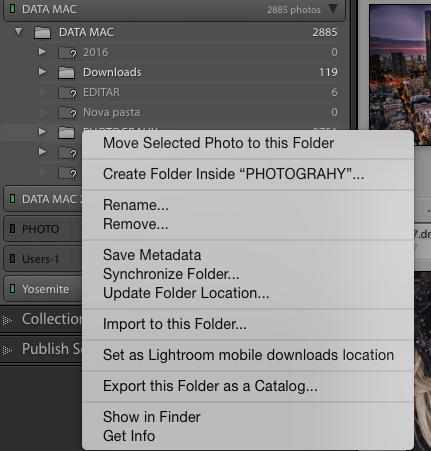
By right-clicking you have access to the menu that allows you to rename, remove, create a new folder, move the selected photos to a specific folder among other options.
All changes made here will also be made on your computer, so if you create a new folder here it will also be created in WIndows Explorer or Finder. This makes it super easy to create consistent file structure . If you choose to create this structure directly in Windows explorer or Finder it will not be automatically recognized by Lightroom, so you will have to import the new folders manually into the Lightroom catalog as we learned in the last post.
Collections in Lightroom
The Collections section is where you can create collections and smart collections. Think of collections as folders that exist only within Lightroom and are one way to group some photos by theme. I like to create collections in order to separate all my photos of the same theme, so I can find them more easily.
My work structure with collections is the same as the organization of the photos when I import them.
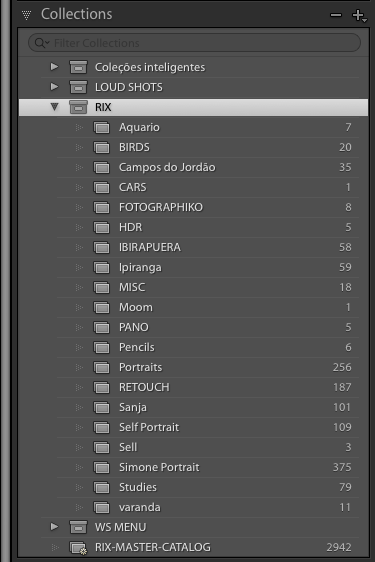
You can also create smart collections. In this kind of collection Lightroom will decide what best fits into the collection based on its metadata. For example, I create a smart collection to find all my favorite images for a given year, choosing the number of stars I assign to those photos for example.
Lightroom will bring all images with a certain classification between certain dates and put it in a collection folder for me. Viola! All my favorite images in one place!
We can also create a master collection, Collection Set, which is nothing more than a folder that contains other collections. For example, you create a master collection for all your portraits and within this collection you place all collections of portraits of different people that you have already photographed, and ready all your portraits are in one place.
Another cool thing is to create a target collection, which will be a specific collection where your photos will be added as soon as you press a shortcut, in this case the B key. I use this as follows:
Arnold’s portrait session. First I create the Arnold collection within my master collection Portraits and by right clicking on the Arnold’s collection I define it as the target collection. So when choosing which Arnold photos I want to keep for editing I just need to press the B key when selecting the photos, and it will go directly to the target collection I have defined.
Publishing
The Publishing Services panel is used to allow you to publish photos to online services where you can share your photos, or export them to a hard drive.
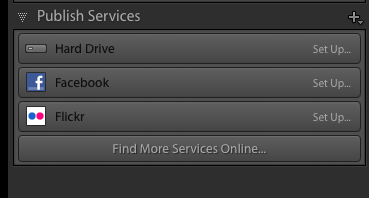
In addition to the ones shown above, we can also add other plugins to publish to other sharing services very easily. This can be a help in case you don’t want to export and then send the photos to the desired service, you can do it right from Lightroom.
This is just the tip of the iceberg in the Lightroom Library Module, but these tools are the minimum requirements for you to use Lightroom in a super smooth way and develop your work without any problems.
As everyone has their own way of doing things I advise you to use this article as a guide to learn how to get started using the Lightroom Library Module and over time you will develop your own techniques and trickeries to use Lightroom.
So, are you applying what you have learned? There’s more tomorrow, leave your questions in the comments or on Twitter.
And if you started with this post be sure to see the others:
Mastering Lightroom in 7 days
Mastering Lightroom in 7 days – Day 01 – Catalog
Mastering Lightroom in 7 days – Day 02 – Import
Mastering Lightroom in 7 days – Day 03 – Library module
Mastering Lightroom in 7 days – Day 04 – Development module
Mastering Lightroom in 7 days – Day 05 – Editing your photos
Mastering Lightroom in 7 days – Day 06 – Presets and Colors
Mastering Lightroom in 7 days – Day 07 Export or Print
![Dominando o Lightroom em 7 dias [ Dia 02 Importação ]](https://fotographiko.zz.mu/wp-content/uploads/https://drive.google.com/uc?id=1Gu_3r4JbQFkjUaYJxUZnSgimTnmm1-Aj)
