If you made it this far you must be wondering; How to export and Print photos in Lightroom? And these and a few other things are the subjects of our 7th and final day of Mastering Lightroom in 7 days.
Today we are going to finish all the service and get a nice mug of coffee to celebrate!
So let’s go to what matters.
Lightroom, export and print your photos like a PRO
Exporting and printing photos is very simple, but you need to know what the purpose of this export is. Print or post on the web?
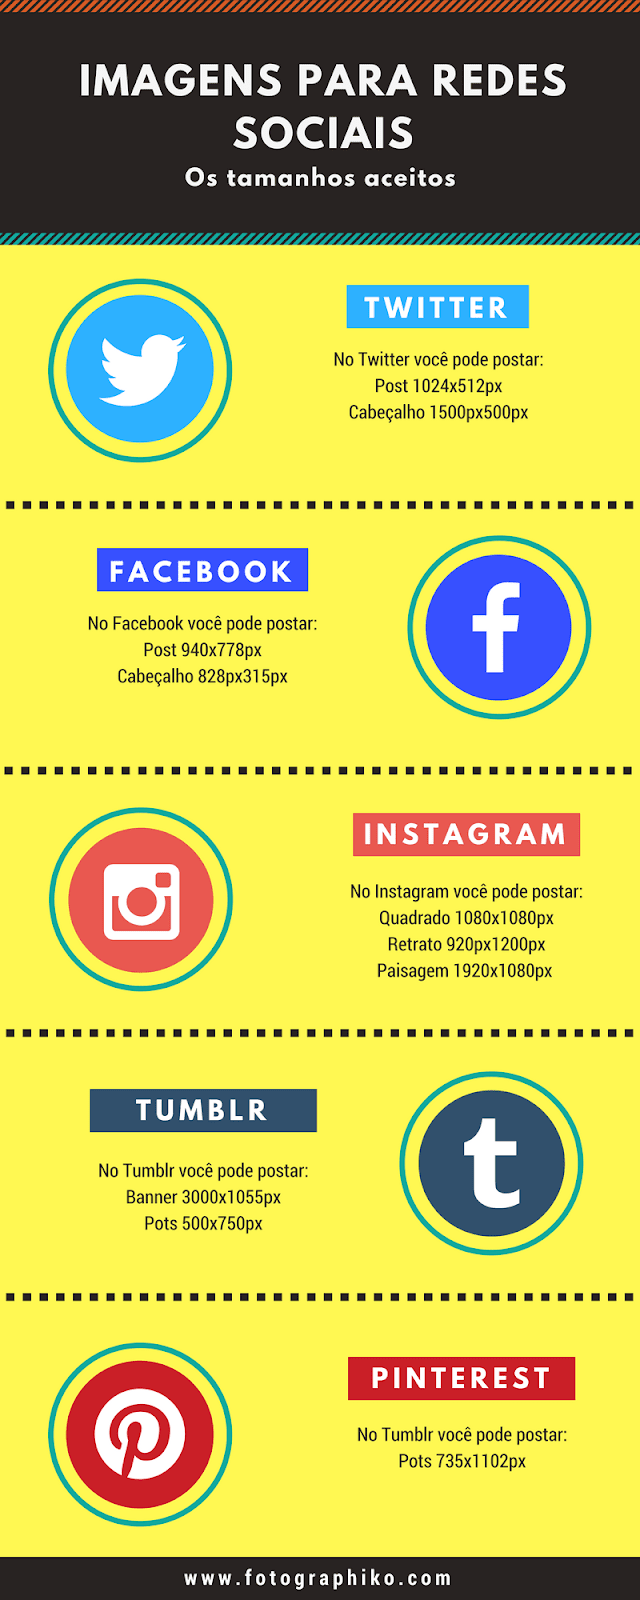
If you are exporting just to post on your social networks or websites the job is easy, the first thing you need to know is what dimensions are accepted on the websites. Depending on the site on which photo you will be shown you will have to configure the photo size differently, and this can change how you crop the image.
The export menu is very easy to find! File> Export

And the Lightroom export dialog may look very complicated, but it really isn’t;
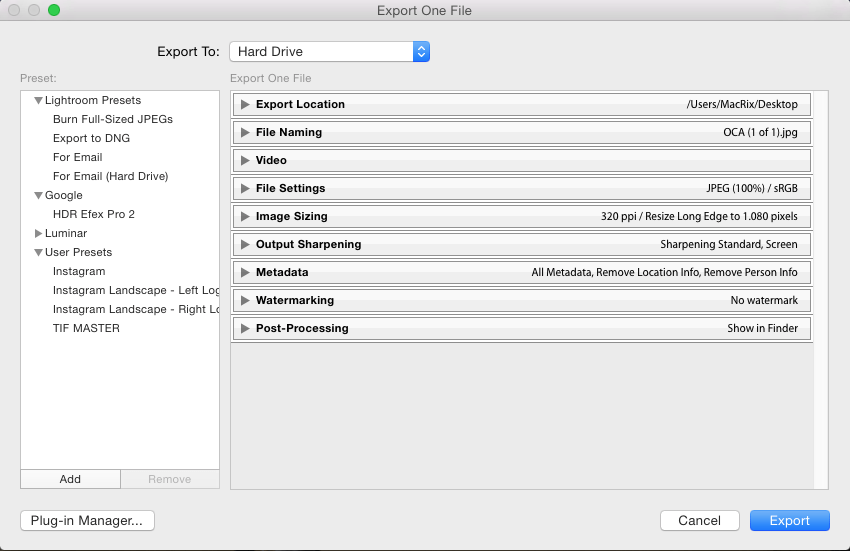
In it we have:
- Location (location on your hard drive where the photo will be saved)
- File name (Name of the file you will give the photo to)
- Video (intended for exporting videos, yes Lightroom also works with videos)
- File settings (define file type, quality and color standard)
- Image size (defines the image size and resolution)
- Sharpness (defines the amount of sharpness that will be applied)
- Metadata (includes photo information along with the file)
- Watermark (Adds a watermark)
- Post-processing (what will happen after the process is finished)
The main adjustments during the photo export process are the quality and file format settings and the output sharpness, as they will influence the quality of your images.
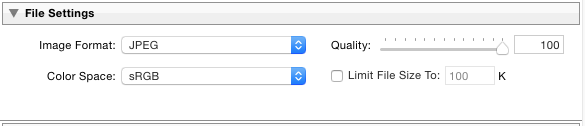
If you are exporting for use on the internet, start by placing the quality between 80 to 100%, it is up to you to define this. The higher the setting, the more megabytes your photo will have, which in turn will make it have a better resolution and quality.
The file format will either be accepted by the website where you will post it, most of them accept JPEG files without any problems. As for the color space, you can use sRGB, which is the most common pattern, so you don’t mess up your colors when exporting to the web.
When it comes to printing your photos it can be a lot more complicated, as we have to know which printer will do the job and what color profiles are accepted by this printer, normally professional photo printers can work with the Adobe RGB color profile , which should be the same color profile as you edited your photos.
If printing the image, always use 100% quality, which is the most logical thing to do, because when we print we want the best quality possible. In some cases we have to prepare the image for printing differently from how much we are preparing the photos for the web only. We’ll talk more about printing ahead.
The rest of the settings are very simple and work both for those who are going to drop the images onto the web or for printing. And one of the most important tabs is the file output sharpness tab. In this output sharpening tab you have some important options.

In the sharpness type you will have 3 options:
- Screen
- Matte paper
- Glossy paper
Which are very self explanatory options, choose the option for the appropriate purpose and everything is fine. Other than that we have how much sharpness that will be applied to your image, and the options are:
- Low
- Normal
- High
In images for distribution I usually choose the following options:
Screen + Normal (or low)
As I normally adjust the sharpness during my editing process, I don’t see the need to adjust the sharpness too high when dropping the files.
If you are going to use this file for printing, choose the paper type first, and then you choose the amount of sharpness that will be applied. For the amount of sharpness it is always worth making one or two test prints first before defining what your final print settings will be. Remembering that different photos need different adjustments.
Another very important option is the dimensions of the file to be finalized, and this can be done when defining the file dimensions in the dimensioning tab.

Here we have the sizing options are:
- Width x height (You define the size of both the width and the height)
- Dimensions (You define the height x width ratio, example. 4: 5 or 16: 9)
- Long edge size (You set the size of the longest edge of the photos only)
- Short edge size (You set the size of the shortest edge of photos only)
- Megapixels (You set the quality in megapixels)
- Percentage (You define what proportion will be used for the photo, ex 50% of the original size)
PPI, myths and truths
Other than that we have to define the density of the pixels, the famous PPI ( Pixel per inch), for this we are going to make things easier. If you are dropping files to be viewed on screens, social media in general, we don’t have to worry about that for a few reasons.
First of them is that the amount of PPI does not influence the quality or size of the image to be viewed on screens. This adjustment will influence when making an impression, but when dropping files to the web or to be seen on a screen does not make the slightest difference. So forget the myth that photos for web with 72 PPI are better, pure bullshit, do not change the size of the file in megabytes and try not to change anything in the resolution of the file.
These 3 photos below were exported to Lightroom, each one with a different PPI confusion, but they all have the same resolution, 1333X2000.


And as we can see all 3 images despite having different PPI settings, they look the same on your computer screen, and also the same file size.
Now when we are talking about PPI for photo printing the subject is completely different. The smaller your pixels per inch the less apparent they will be seen in your prints. So an image with 300 PPi is completely different from an image with 72PPI when printed.
Looking at the photos above we can see that if we change the PPI settings they will have an influence on the size in inches of the image, which size will be used to define the size of our print.
As soon as you are preparing your image for printing, the ideal is to know which dimensions the image will be printed on, so we can calculate how much PPI / DPI we can use to achieve the best possible quality.
Let’s use a 16×10 image as an example, what happens to our file when we change from 72 PPI to 300 PPI. Note that in the photos below the same file was configured to have the same size in inches, but using different PPI settings we have files not only with different resolution but also sizes in different megabytes.
This happens because of the sampling (resample) that both LIghtroom, Photoshop and any other good image editor does when we change the resolution of the photos. In the example above we have two photos that will be printed in the same size but with totally different quality.
So the first step to define which print settings you will use in Lightroom, start with the physical size that your print will have and then try to adjust the amount of PPI accordingly. A good rule of thumb for PPI quantity is that normally high quality prints are always between 240 PPI and 300 PPI.
Then after all this you can already send your photos for printing, but if you have a beautiful print and want to do everything yourself in your home, I advise the Lightroom Printing Module.
If you are just posting on social networks, it is always nice to keep in mind what are the most accepted sizes, this ensures that you always export the best possible photo to your social networks. Since most social networks compress images once you upload them I usually double the resolution of the photos as possible. But in any case, a table of resolutions accepted by most social networks follows.
Lightroom print module
If you are going to print your photos using the Lightroom print module, you may be surprised at the number of options that are present in this section. This makes Lightroom a complete program for exporting or printing your photos.

The printing tab can be found in the top menu along with the development or library tray. And inside this tab you will be bombarded with a world of options, don’t worry because adjustments in this tab do not change the edition of your photos, just how it will be printed.
The first thing you should do when configuring your printer using Lightroom is to define the type of page you are going to use, and this will depend on the type of printer you have installed on your system, to configure the type of page just go to the page setup option at the bottom left of Lightroom.

Here we have all the normal options for a standard print, and if you have already printed any file using a text editor for example, this section has no secrets for you.
As soon as you define which type of paper you are going to use it is time to define the general print layout, and this is done directly in Lightroom, the easiest option to create is to use one of the presets that come with Lightroom, and for that you just choose one of the presets in the template menu on the left sidebar of the program.

Here we can see that we have a lot of layout options already predefined within Lightroom and it will be rare that you need to create your own layout, but if you need to create your own layout it is entirely possible.
If you want to create your own print layouts just go to the right sidebar and choose a customized package, and add your photos the way you want, to scale the photos inside the folder print area using the blue anchors on the edges of the photo.

So you can create virtually any photo arrangement for printing your photos.
In the other blocks of options on the right sidebar we have a lot of page layout options, and with these options you can define exactly what your printed page will look like.
Things like borders or contours in the photos, color of the outline, how the measurements will be shown on the screen, insertion of cells with predefined sizes, all of these can be defined in the menus on the right sidebar of the Lightroom print module.

In the following menus on the right sidebar I have options for placing a watermark, and I usually don’t see reasons to put this on a printed photo, other options that I personally don’t find very useful, except the crop guides that can be used to help you crop the page after the photos are printed.
The most important part of the Lightroom print module is the Print Job tab, the last menu on the right sidebar. In it we have all the settings to achieve a great impression of our photos.

Here many of the options will be very similar to the options we have when exporting files, and they are practically the same, except for the draft mode which is the first option in this block, and can be used to create a test print just to ensure that the layout options are correct, do not use this option to check colors and contrast as this is not her function.

All other options have to do with the final print quality of your photos, and are super important for a good finished photo.,
Remember the PPI chat we talked about at the beginning of the article, so now it will be very useful. Normally when we are printing an image and we want a good print quality the PPI adjustment of the image has to be above 240 PPI, this guarantees a good resolution of the image. Of course it depends on the size of an image this can vary, because the bigger the image the tendency is that it has a smaller amount of pixels per inch.
In this image we can see that if it is printed in a size of 8×10 inches the amount of natural PPI of the photo is 420 PPI, which will be great for printing this size.

However, the same image now enlarged to 11.5×16 inches at the camera’s native resolution results in a PPI adjustment of only 192 PPI, meaning that to print at this size we may have some problems with the image resolution as soon as it is printed.
In this case I advise you to activate the image resolution option and in the print job menu and set it to at least 240 PPI. The Lightroom magnification algorithm will take care of creating pixels where necessary so that the image has an acceptable resolution at the time of printing.
Once everything is set up, it’s time to hit the print button and print your photos. Whenever we are creating the final impression of the image, we will face some issues such as contrast reproduction and color density when printing. So maybe more than one print will be needed to reach the final product, adjustments in contrast, brightness and sharpness can be made between one print and another until you get to something that represents as faithfully as possible what you see on your computer screen.
Of course, there are more things when it comes to photo print resolution, especially in large sizes, and we will not discuss that in this post, but you can research subjects such as photo viewing distance in relation to image size and PPI amount. Another thing that you can research and that will certainly make a difference in the product are ICC profile settings, both for the printer and for the type of paper you will use to finalize your photos. But all this is a matter for another time.
And that’s it my people, you just learned how to export and print using Lightroom, but not just that for the last week you have learned how to use Lightroom in just 7 days, not just use the master most of the very important tools for any photographer.
Any questions you already know, just leave it here in the comments.
Mastering Lightroom in 7 days
Mastering Lightroom in 7 days – Day 01 – Catalog
Mastering Lightroom in 7 days – Day 02 – Import
Mastering Lightroom in 7 days – Day 03 – Library module
Mastering Lightroom in 7 days – Day 04 – Development module
Mastering Lightroom in 7 days – Day 05 – How to edit your photos
Mastering Lightroom in 7 days – Day 06 – Presets and Colors
Mastering Lightroom in 7 days – Day 07 – Export or Print

